Continued from “Building a Windows Service – Part 5: Adding command-line installation”
So we have a working service it’s time to start adding some logging. Proper event logging is critical to monitoring services so we are not going to use .NET’s typical excuse for events. Rather we are going to build a ‘real’ message dll from our server, register it as a message event source, and have a real event log. Sounds crazy I know, but all the hard work has already been done by CSharpTest.Net.Generators.exe. We are also going to use CmdTool.exe to integrate integrate into Visual Studio.
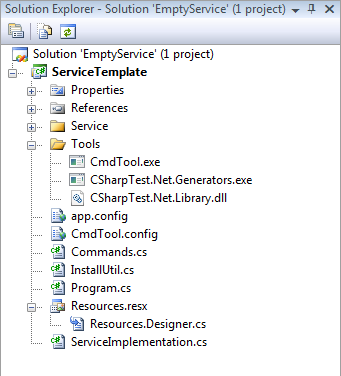
The first thing we are going to need to do is to pull three binaries from my library (available here). The three we are after are CmdTool.exe, CSharpTest.Net.Generators.exe, and CSharpTest.Net.Library.dll which the Generators assembly depends upon. I’m going to just create a folder in the project directory called “Tools” and add these files there. If you’ve never used CmdTool before you will need to register it by running “CmdTool.exe Register” from an administrative command prompt.
Creating CmdTool.config
To use CmdTool for our resources we need a configuration file that tells it what to do. This is fairly trivial and is explained in some detailed here: “CmdTool.exe Configuration“. So we are going to copy/paste this default configuration and save it into a file called “CmdTool.config” in the root of our project. Here is our configuration file:
<?xml version="1.0" encoding="utf-8" ?>
<CmdTool xsi:noNamespaceSchemaLocation="http://csharptest.net/downloads/schema/CmdTool.xsd" xmlns:xsi="http://www.w3.org/2001/XMLSchema-instance">
  <match filespec="*.resx">
    <generator debug="false">
      <execute exe=".\Tools\CSharpTest.Net.Generators.exe" />
      <arg value="ResX"/>
      <arg value="-input=$(InputPath)"/>
      <arg value="-namespace=$(Namespace)"/>
      <arg value="-class=$(ClassName)"/>
      <arg value="-public=true"/>
      <arg value="-partial=true"/>
      <arg value="-test=true"/>
      <arg value="-sealed=true"/>
      <arg value="-base=System.ApplicationException"/>
      <arg value="-rxns=$(DefaultNamespace)"/>

      <std-output extension=".Designer.cs"/>
    </generator>
  </match>
</CmdTool>

Once our configuration is there we need to create standard Resources.resx file just as you always would. In order for CmdTool to find the configuration file above it must be in the same directory, or a parent directory, of the resource file. I’m just adding the Resources.resx file in the root of the project.
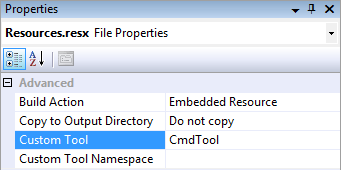
After we’ve added the Resources.resx file to the project we now need to modify the “Custom Tool” property for the solution item. Right-click on the resx file and select “Properties”. You should the option there, just type ‘CmdTool’ in the value next to Custom Tool. Make sure you’ve registered CmdTool or you will get an error. The end result should look like this:

Once this is changed, you’re output window should display “Generating C:\{some path}\Resources.resx” with the full path to the location of the resx file. Once that is working we already have a lot of bang for our buck. Creating a resource string like “String1″, “{0}” will now create a static method with the signature ‘string Resources.String1(object _0)’. That is neat, we can even create exceptions just by renaming “String1″ to “String1Exception” and presto-magic happens and you have a complete exception class. I can’t live without this thing, I’ve used it sparingly in the open but I use it extensively in my day job as well as private projects. We have over 250 custom exceptions, each have a unique HRESULT that can be written to the Event Log and monitored. This is what we are after, Adding support for the event logging part.
Before we go any farther with this you should be very familiar with what is an HRESULT, what it’s composite parts are, and what their constraints are. Most of this is documented in the help for Message Text Files which is exactly what we are going to be generating.
So let’s get started turning our resx into an event log writer. Step 1, we need to add some information, the easiest way is to just copy/paste the following settings into the “View Source” xml view:
  <assembly alias="mscorlib" name="mscorlib, Version=2.0.0.0, Culture=neutral, PublicKeyToken=b77a5c561934e089" />
  <data name=".EventCategory" type="System.Int32, mscorlib">
    <value>1</value>
    <comment>General</comment>
  </data>
  <assembly alias="System" name="System, Version=2.0.0.0, Culture=neutral, PublicKeyToken=b77a5c561934e089" />
  <data name=".EventSource" type="System.Uri, System">
    <value>ServiceTemplate/ServiceTemplate</value>
  </data>
  <data name=".AutoLog" type="System.Boolean, mscorlib">
    <value>True</value>
  </data>
  <data name=".AutoLogMethod" type="System.Uri, System">
    <value>EventLogging.WriteEvent</value>
  </data>
  <data name=".Facility" type="System.Int32, mscorlib">
    <value>256</value>
    <comment>General</comment>
  </data>
  <data name=".HelpLink" type="System.Uri, System">
    <value>http://example.com/?HResult={0:x8}</value>
  </data>
  <data name=".NextMessageId" type="System.Int32, mscorlib">
    <value>2</value>
  </data>
  <data name=".EventMessageFormat" xml:space="preserve">
    <value>
More Information: {1}
Excpetion Type: {2}
Base Type: {3}
Stack Trace: {4}
{5}</value>
  </data>
Once the above has been inserted into the resx file you can verify proper behavior by adding any resource string. When you save the resx file, a Comment value should magically appear, something like “#MessageId=1″. Do not change or remove, these ids should not be reused to avoid confusion with old event logs, the “.NextMessageId” controls the next id that will be assigned. Occasionally, if you’re custom exception crazy, you may run into source merge conflicts. At that point you need to make sure all messages have a unique id (it will fail if this is not the case) and that the “.NextMessageId” value is higher than all existing ids.
The “.AutoLogMethod” above, “EventLogging.WriteEvent” is to allow us to customize the values provided to the event log. This method is called when either a method is called to format a string, or when an exception is constructed (not thrown). Because we are augmenting the data in the message with the “.EventMessageFormat” above we are required to write this method. We could simply remove both the “.AutoLogMethod” and “.EventMessageFormat” and it would just create the log and write it for us. By customizing this however we can get some fixed fields on our exceptions that will help in monitoring and triggering of alerts. So here is our custom EventLogging class that will provide some fixed values and also provide a serialized exception as the binary data for the event.
public class EventLogging
{
    private static readonly Dictionary<string, EventLog> _logs = new Dictionary<string,EventLog>(StringComparer.Ordinal);

    public static void WriteEvent(string eventLog, string eventSource, int category, EventLogEntryType eventType, long eventId, object[] arguments, Exception error)
    {
        EventLog log;
        lock(_logs)
        {
            if(!_logs.TryGetValue(eventLog + '.' + eventSource, out log))
                _logs.Add(eventLog + '.' + eventSource, log = new EventLog(eventLog, ".", eventSource));
        }

        const int fixedCount = 6;
        object[] fullargs = new object[arguments.Length + fixedCount];
        int ix = 0;
        fullargs[ix++] = eventId.ToString("x8");
        fullargs[ix++] = error == null ? null : error.HelpLink;
        fullargs[ix++] = error == null ? null : error.GetType().ToString();
        fullargs[ix++] = error == null ? null : error.GetBaseException().GetType().ToString();
        fullargs[ix++] = error == null ? null : error.StackTrace;
        fullargs[ix++] = new StackTrace(3).ToString();
        Array.Copy(arguments, 0, fullargs, fixedCount, arguments.Length);

        byte[] data = null;
        if (error != null)
        {
            try
            {
                using (MemoryStream ms = new MemoryStream())
                {
                    BinaryFormatter ser = new BinaryFormatter();
                    ser.Serialize(ms, error);
                    data = ms.ToArray();
                }
            }
            catch { }
        }

        lock(log)
            log.WriteEvent(new EventInstance(eventId, category, eventType), data, fullargs);
    }
}
Now we can build again, and the biggest thing left is getting these .NET resources turning into Win32 message resources. We have two options here, option 1 is to produce a stand-alone message dll. This can work well in some cases, but I really want an all-in-one approach here so I’m going to embed the messages into this managed assembly. File versions, app icons, etc should survive; however, be aware that this tool builds a win32 resource that must later be bound to this project. To get the generator producing resources we just need to add a pre-build event.
$(ProjectDir)Tools\CSharpTest.Net.Generators.exe ProjectResX "$(ProjectPath)" /name=Messages\Resources "/tools=$(Registry:HKEY_LOCAL_MACHINE\SOFTWARE\Microsoft\Microsoft SDKs\Windows@CurrentInstallFolder)Bin"
Here I’m using the Windows SDK versions of RC.exe and MC.exe which are both required. You could optionally change the tools path to another location if desired so long as both of these tools exist. After you define the pre-build event above build the project. Assuming that worked there is a new directory below the project file called “Messages”. This Messages directory contains two C# files we need to add to this project, Resources.Constants.cs, and Resources.InstallUtil.cs. Include these by clicking the “Show All Files” option and right-click to select “Include in Project”. Now we need to manually add an entry to our project. First right-click the project and select “Unload Project”. Then right-click again and select “Edit XXX.csproj” to view the file in XML. At the end of the first PropertyGroup element we need to add the following:
  <PropertyGroup>
    ...
    <Win32Resource>$(ProjectDir)Messages\Resources.res</Win32Resource>
  </PropertyGroup>
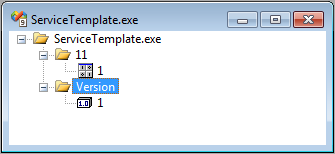
 This can be done in the project properties dialog, however, if you have assigned an icon, manifest, or something it will be erased. This ensures those properties remain although you will not be able to edit them. Now rebuild the project. You can verify that the resources are properly being created by using the File -> Open -> File… command and selecting the .exe file you just built. You should see at least the resources depicted to the right.
Now that we’ve built it we can simply run the .exe file with the ‘install’ argument to register both the service and the event log/source. Before we do that it would be nice to have something in that event log to see. So let’s start with adding a resource string for service startup and shutdown. I’m going to start with the following messages in the resources.resx file:
| ServiceStartFailedException | The service {0} failed to start. | #MessageId=1 |
| ServiceStarted | The service {0} started successfully. | #MessageId=2 |
| ServiceStopped | The service {0} has stopped. | #MessageId=3 |
Now we are going to update the service process to add the logging:
protected override void OnStart(string[] args)
{
try
{
OnStop();
_service = new ServiceImplementation();
List allarguments = new List (_arguments);
if (args != null && args.Length > 0)
allarguments.AddRange(args);
_service.Start(allarguments);
Resources.ServiceStarted(ServiceName);
}
catch(Exception e)
{
throw new ServiceStartFailedException(ServiceName, e);
}
}
protected override void OnStop()
{
if (_service == null)
return;
try
{
_service.Stop();
_service.Dispose();
_service = null;
}
finally
{
Resources.ServiceStopped(ServiceName);
}
}
Once this has been added we will build and run the following to install, start, and stop the service. After that we are going to the Win7/Win2008 command-line tool to export the log to xml so we can peek at the events.
ServiceTemplate.exe
net start ServiceTemplate
net stop ServiceTemplate
Wevtutil.exe qe ServiceTemplate /f:RenderedXml
The output of Wevtutil.exe should display something like the following:
<Event xmlns='http://schemas.microsoft.com/win/2004/08/events/event'>
  <System>
    <Provider Name='ServiceTemplate'/>
    <EventID Qualifiers='16640'>3</EventID>
    <Level>4</Level>
    <Task>1</Task>
    <Keywords>0x80000000000000</Keywords>
    <TimeCreated SystemTime='2011-11-17T22:10:47.000000000Z'/>
    <EventRecordID>3</EventRecordID>
    <Channel>ServiceTemplate</Channel>
    <Computer>HOSTNAME</Computer>
    <Security/>
  </System>
  <EventData>
    <Data>41000003</Data>
    <Data></Data>
    <Data></Data>
    <Data></Data>
    <Data></Data>
    <Data>
      at ServiceTemplate.Service.ServiceProcess.OnStop()
      at System.ServiceProcess.ServiceBase.DeferredStop()
      at System.Runtime.Remoting.Messaging.StackBuilderSink._PrivateProcessMessage(IntPtr md, Object[] args, Object server, Int32 methodPtr, Boolean fExecuteInContext, Object[]& outArgs)
      at System.Runtime.Remoting.Messaging.StackBuilderSink.AsyncProcessMessage(IMessage msg, IMessageSink replySink)
      at System.Runtime.Remoting.Proxies.AgileAsyncWorkerItem.ThreadPoolCallBack(Object o)
      at System.Threading.ExecutionContext.Run(ExecutionContext executionContext, ContextCallback callback, Object state)
      at System.Threading._ThreadPoolWaitCallback.PerformWaitCallbackInternal(_ThreadPoolWaitCallback tpWaitCallBack)
      at System.Threading._ThreadPoolWaitCallback.PerformWaitCallback(Object state)
    </Data>
    <Data>ServiceTemplate</Data>
  </EventData>
  <RenderingInfo Culture='en-US'>
    <Message>
      The service ServiceTemplate has stopped.

      More Information:
      Excpetion Type:
      Base Type:
      Stack Trace:
      at ServiceTemplate.Service.ServiceProcess.OnStop()
      at System.ServiceProcess.ServiceBase.DeferredStop()
      at System.Runtime.Remoting.Messaging.StackBuilderSink._PrivateProcessMessage(IntPtr md, Object[] args, Object server, Int32 methodPtr, Boolean fExecuteInContext, Object[]& outArgs)
      at System.Runtime.Remoting.Messaging.StackBuilderSink.AsyncProcessMessage(IMessage msg, IMessageSink replySink)
      at System.Runtime.Remoting.Proxies.AgileAsyncWorkerItem.ThreadPoolCallBack(Object o)
      at System.Threading.ExecutionContext.Run(ExecutionContext executionContext, ContextCallback callback, Object state)
      at System.Threading._ThreadPoolWaitCallback.PerformWaitCallbackInternal(_ThreadPoolWaitCallback tpWaitCallBack)
      at System.Threading._ThreadPoolWaitCallback.PerformWaitCallback(Object state)
    </Message>
    <Level>Information</Level>
    <Task>General</Task>
    <Opcode></Opcode>
    <Channel></Channel>
    <Provider></Provider>
    <Keywords>
      <Keyword>Classic</Keyword>
    </Keywords>
  </RenderingInfo>
</Event>
Of course you may not want that much detail in your event log for informational messages like this one. The easiest way to achieve that is to separate the errors from the exceptions by creating another resx file with a different facility id (It can use the same event log/source, or a new one). For some uses this much detail is more than you want even for exceptions, but it should be obvious enough now how to modify this to prune out the data you don’t want. Our service is fairly complete now, it installs, run, logs, etc. We have a little more work to do in the service behavior itself to support some nice-to-have things like pause/continue, custom messages, etc.
Continued on “Building a Windows Service – Part 7: Finishing touches“